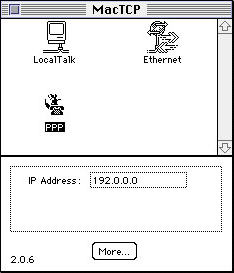
Highlight the PPP icon by clicking it, and click on the more button at the bottom. ignore the IP Address box.
This information assumes that you have a working knowledge of your Mac system, and have already obtained an account with a service provider in your area. The service provider used in this example is Sasktel Sympatico in Saskatchewan. The IP addresses for the various dns servers and gateways will vary depending on your provider's setup. Your Service Provider must supply you with all of the relevant settings
This page is based on a the use of a modem to connect using PPP by dailing into your service provider's system.
| You should get a dialogue box as shown on the right. Highlight the PPP icon by clicking it, and click on the more button at the bottom. ignore the IP Address box. |
|
 |
Use the Server assigned address rather than the Dynamic option, even
if your provider tells you he uses Dynamic IP address assignments. Usually service providers only have a (partial) Class C available. Address Class and Subnet Mask go hand in hand. If you change one, the other will automatically be modified. If you get conflicting information (eg.: Class B with Class C type Subnet Masking) from your provider, use the suggested Subnet Mask instead of the Class: typically a Class C uses 255,255,255,0. Use the slider to get to the correct setting. Ignore the Net, Subnet, Node and related Lock boxes. Enter the Domain and IP Address of your ISP's (Internet Service Provider) Domain Name Server, and indicate the Primary ("Default"). Usually you will have two DNS servers, but one is sufficient. Finally, enter the Gateway Address. This is normally the address for the router or firewall that gives your ISP access to the web. Click OK when you are done, and close the MacTCP dialogue box. Once again, please note that the settings shown are for the Saskatchewan Sasktel Sympatico service: Your ISP must supply you with all of these setting. |
| You should get a dialogue box as shown on the right. As discussed previously, these settings are for a modem connection to an ISP. Change the settings in the dialogue box to the ones show to the right. If you have already created a PPP Server setup, select it and click the Config... button; else click New... and enter a name (any name), (and then click Config...). |
 |
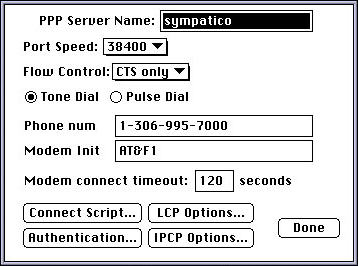 |
Port Speed should be one setting higher than what your modem is capable of
maintaining. Set all of the other settings to whatever your ISP provides. Flow Control usually works best on CTS only. Press the Connect Script... button to continue. |
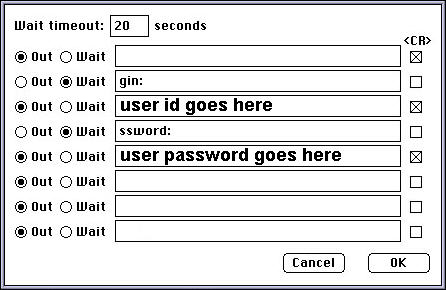
| Change the settings to reflect what's shown on the right. Note that the login and password queries by your ISP's server may be different from what is shown, but for the most part these work fine. Insert Your account name and the corresponding password where show. Make sure to check off the appropriete check boxes as shown! Click OK and then click the Authentication... button. |
 |
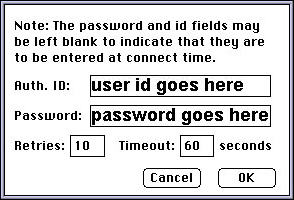 |
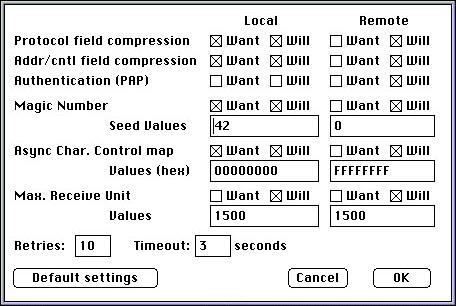
Enter the appropriete information and set the Timeout and Retries to
the values shown. Click OK and then click the LCP Options... buttons. |
| Change the settings to reflect what's shown on the right. For most Information Service
Providers the settings shown will work. Click OK and then click on the IPCP Options... button. |
 |
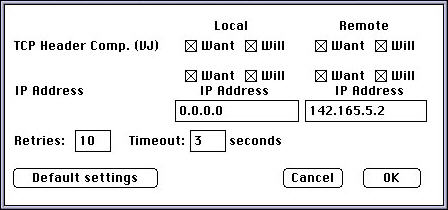 |
Change the settings to reflect what's shown on the left. Enter the appropriete IP Address under Remote. This is the same as the Primary DNS under MacTCP. Click OK to continue. |
It may be a good idea to close the Config PPP dialogue box, and restart the computer before continuing.
When the computer restarts, you can open Config PPP again, and click the Open button on the Config PPP dialogue box to dail out and attempt connection. Or alternately, open Netscape or whatever browser you have, and this should force the computer to attempt connecting to the web ...